It is important to provide a good mixture of soil for the cherry tomato, water it regularly, and, according to my experience, provide the right environment in which it will grow well. Enjoy your creativity and sweet fruits!
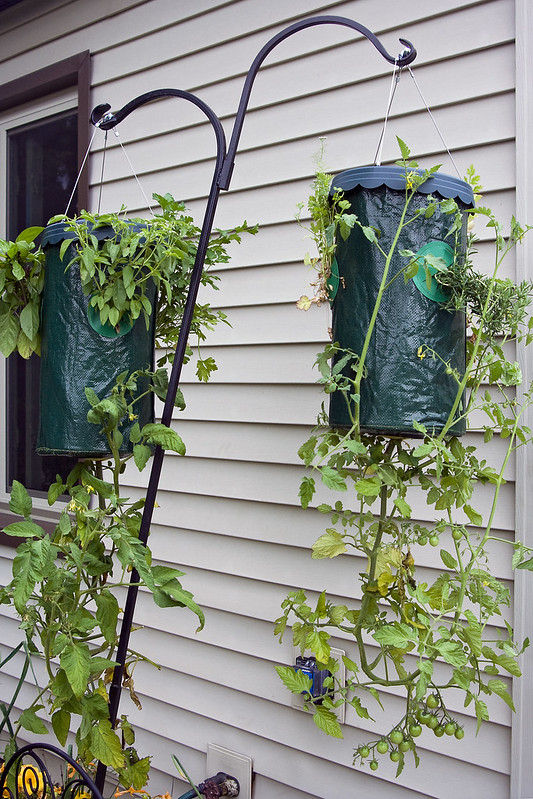
You’ve probably already read about growing tomato upside down. This method is especially suitable for certain vegetables, such as cucumbers, chili peppers, peppers and cherry tomatoes, which is one of the best varieties for this type of planting. If you have limited space for vegetables or do not have it at all – this may be a good option for you.
How to grow cherry tomato upside-down?
Use a bucket with a volume of about 1.5 gallons. Carefully cut a hole in the bottom with a sharp knife or, better yet, a scalpel. The hole should be about five inches in diameter. For better air circulation and drainage, you can drill about six small holes in the bottom.
Cut a piece of net used on the windows as insect protection, fold it and cut it in the shape of the letter “V”. You can also use a coffee filter for this purpose. Glue the net to the bottom of the bucket using insulating tape. Carefully pull the plant out of the seedlings through the hole and net, taking care not to damage the roots. Pour some soil into the bucket, wrap it around the plant a little and add the rest of soil. Hook in a sunny place where you can easily reach the crop.
Growing Cherry Tomatoes Upside-Down
Since I liked it, and it seemed simple to me, I decided to make a simple experiment, so in the next few days, I got a seedling of cheery tomato, found an old bucket and followed the instructions.
My idea of growing cherry tomato upside-down was to put a bucket at the ends of the two blocks to free the middle part. That way, I could slip a seedling in between, which would stand upside down as I slowly poured the soil into the pot. After that, I just used a plastic mosquito net because it seemed like a firmer and safer option, which I cut out and glued to the bottom.

Photo by McBeth on Flickr
Take Care How You Put the Net
I had a little trouble pulling the tomato seedling through the hole on the net, so I widened it with scissors, which still didn’t turn out to be the smartest idea. But I’ve already fixed that somehow. Next, I glued the net on the outside. The reason is ground humidity, and the tape from inside the bucket quickly peeled off.
For the soil, I used greenhouse soil, i.e., finely milled – loose, with already added manure. Thus, you don’t need to fill the bucket with soil to the top or even half of it. Have in mind that the water that should reach the plant. Also, that way, you can easily pull out the weeds that grow after a while, and they surely will not grow anymore.
First, I attached a container with tomatoes to the construction in the greenhouse because of the heat and not-so-large oscillations in temperatures. I have to admit that the cherry tomato was a little sore at first, so it got a burgundy soup treatment and regular watering.
When I’ve noticed it was getting stronger and growing more and more, I moved it to the terrace and hooked it to the roof beam. It continued to thrive, and the stem itself and all the branches grew upwards, seeking light. However, as strong winds were blowing in my area, at one point, a stronger one broke the main branch, but I did not despair but picked it up and glued it with plain tape to the bucket, and the tomato continued to bear fruit without any issues. I soon had a few red fruits. There wasn’t much constipation, so it was not a big deal to grow it up.
During August, due to some work on the house, I was forced to move it, and I had nowhere to hang it, except, believe it or not, in the living room, to the folding bar that I had long ago screwed to the ceiling.
It Liked the Change of Place!
As the ambiance changed, my upside-down cherry tomato began to flourish visibly every day. I soon had to decapitate it and continue to do so because it erupts with new branches wherever it can, and there are many fruits. I’m planning a big harvest these days.
So, it is possible to grow cheery tomatoes upside down! It is important to provide a good mixture of soil, water it regularly and, according to my experience, provide the right environment in which it will grow up well. It doesn’t have to be a room, but it’s important to put it in a more secluded place, protected from the wind, but also the strong and direct sun, and of course, make sure that the birds don’t ‘steal’ your first sweet fruits.


